Showing posts with label Cyber Stuff. Show all posts

Sunday, 29 December 2013

Report to Facebook when you are tagged in copyrighted uploads

| Sunday, December 29, 2013 | | | Be first to comment!

Facebook, respects copyright laws. But when any platform allows you to share media like pictures, videos, etc. then it is quite hard to keep a track on the media shared. So, it is quite possible and easy to share copyrighted media, on Facebook.


Reporting content like these, requires users concern. Any Facebook user can report whenever, he/she encounters a copyrighted media. To do so,
  1. Go to your activity log from timeline review.
  2. From there hit hide post, 
  3. After the post is hidden it will ask you to report/remove tag, click it.


From the pop-up that appears click on, "Is this your intellectual property?" at the bottom.


Select "Report this to Facebook as a legal rights infringement. And hit continue. Facebook also allows you to contact a designated Facebook officer using the traditional but slower methods,

Facebook, Inc.
Attn: Facebook Designated Agent
1601 Willow Road
Menlo Park, California 94025
650.543.4800 (phone)
650.560.6293 (fax)
ip@fb.com
Author's Bio: Shubhashish Shukla (follow him) is the person behind Sector Techno (twitter, facebook), a technology blog. An always learning web developer.

Sunday, 13 October 2013

How to opt out of Google's shared endorsement?

| Sunday, October 13, 2013 | | Be first to comment!

Google has announced an update in its terms of services, which will be enforced on 11th of November 2013. 

What is shared endorsement?

As the word suggest endorsement simply means a recommendation of a product in an advertisement. After these new Google terms of services will go live, search results will start to use your Google Plus profile's public data to recommend a product in advertisements.

ALSO SEE: Google Analytics application for Android devices- Analytics at your fingertips
Comparing SEO strategies for twitter and Facebook
Update RSS feeds immediately: Feedburner

A number of users are angry about this new release as Google will now use your face (profile picture) and name in advertisement. But generally speaking that is not a thing to dislike as Google will only use your public data to recommend products and services to other users.
Google Plus Settings shared endorsement
Settings Google Plus

How to opt in or out of Google's shared endorsement?

Google still lets its user decide whether they can use your profile picture and name, that is, you can always opt in or out of the Google shared endorsement.
  1. Login into your Google Plus.
  2. Go to "Settings" page from sidebar navigator.
  3. Click 'Edit' link under Shared Endorsements (shared endorsement setting).
  4. On the next page that opens up you can un-check and click Save.
opt in or opt out of Google's shared endorsement
Opt in or out of shared endorsement

Author's Bio: Shubhashish Shukla (follow him) is the person behind Sector Techno (twitter, facebook), a technology blog. An always learning web developer.

Wednesday, 18 September 2013

Self Publish Books online with Pothi.com

| Wednesday, September 18, 2013 | | Be first to comment!

If you are a start-up writer, or maybe a renowned one, institute or any organization. You always have something to publish and/or sell/distribute in the market. But going through the processes of offset printing is quite tiresome and requires a good deal of money to start.

Publish Books Online

Pothi.com works on POD or Print-on-Demand infrastructure. In this type, of infrastructure you have the ability to get your content printed only when required and in exact quantity required. This service uses latest technologies like digital printing, and the result is a bit costly as compared to traditional, offset printing works. But the quality is the best. That is, you are not required to invest anything out of your budget.

Who can use this service?

  1. Individuals- Get your book published for public/private circulation.
  2. Publishers- Do short-run reprinting or publish books with niche audience.
  3. Coaching/Training Institutes- Supplementary books and notes.
  4. NGOs/Other Organization
Pothi.com supports a DIY (Do IT Yourself) model. You can submit your book's content using Microsoft Word or any other Word Processor. But the problem again is, you need people to format your content properly and create Cover Page. Generally, these works are done by professionals and it all adds to the cost of the book. Other way out is to do it yourself using Desktop Publishing software. But they may still prove to be quite confusing and waist of time especially for authors whose priority is to remain creative and productive.

Do it yourself or DIY

Pothi.com provides their own tool for creating cover pages seamlessly. You can also select from pre-designed templates.  Or you can get it done by some one else too. Furthermore, you can create and publish your own e-books in PDF as well as EPUB format.

book cover design online
Book Front designed using Cover design tool

Estimate Price of the book

Pothi.com also provides a tool to estimate the cost per book (print cost) and MRP which is 'Print Cost' + 'Author's profit margin' per copy. Author's margin is entirely, author's choice he/she can set it as low or as high they like.

Payment

After putting your newly published book on sale, your can track your sales and earnings using Author Dashboard. The payments method can be selected using the Remittance section.

The available payment methods are-
  1. EFT or Electronic Fund Transfer- applicable only if you have a bank account in India.
  2. PayPal- only for non-India residents.
  3. Check- available only in INR (Indian Rupee).

What else

You can also create free e-books. For the world to read. Create e-books using your RSS feeds of your Blogger or WordPress blogs. Since this service uses feeds to create your e-book, therefore, the feeds type selection must be carefully changed before requesting. Feeds can be toggled between partial or full.

Sunday, 15 September 2013

Stop notifications of annoying messages on Facebook

| Sunday, September 15, 2013 | | Be first to comment!

Message organizing system on Facebook divides all your messages into two categories and makes all messages accessible under those two categorize. These categories namely, Inbox and Others, are accessible on your messages page. Alternatively you can also access them from your messages icon of navbar or navigation bar.

The main difference between the two categories is that you get notified when a message lands in your Inbox tab, while no notifications are generated when any message lands in your Other tab. 

ALSO SEE: Facebook new Insight for Facebook fan pages
Facebook rolled out verified accounts
Sticky Note app for Ubuntu

These filtering are done by Facebook's automated system. In the messages filtering system, you can opt between Basic Filtering or Strict Filtering, what these filters exactly are, are out of scope for now.

But these filters were made to remove unnecessary and annoying conversations, from popping notifications on your navigation bar's messages counter. These usually, place messages under group's chat, messages from various pages, away. But after all these are automated and system and usually places some important friends messages into Others tab.

move Facebook chats to Inbox or Other
Move messages to Inbox

How to move message to Inbox tab?


  1. Go to messages page, by click 'See All' from messages counter on the top. On just visit Facebook's message page.
  2. Now, select Inbox or Other tab.
  3. Select the appropriate conversation.
  4. Then click Action tab, and select Move to Inbox or Move to Other.
Do you know you can forward your Facebook chat conversations to any of your friend with Facebook's inbuilt functionality.

Friday, 23 August 2013

How to move conversations to Primary,Social, Promotions in Gmail?

| Friday, August 23, 2013 | | Be first to comment!

In a previous article I shared news about the new Gmail inbox update [official video], and how to get it. In the new Gmail inbox all the mails are categorized under a maximum of five categories namely, Primary, Social, Promotions and Forums.

Because of automatic categorization it is quite likely to have your important newsletter or mails to get shifted under the category of less important mails. In such cases, you are required to move the mail or mails to the appropriate category.

How to move emails from one category to another?

  1. Log-in into your Gmail account.
  2. Switch to the tab were you have received any email that according to you belongs to another category.
  3. Click and hold that mail, and drag and drop it to the appropriate category.
  4. After doing, so you will be asked to put that single conversation into your chosen category or place all the mails received from that mail address.
Another way, to do so is by right clicking on the emails and then selecting the appropriate category from "Move to tab" option.

move mails from primary to social, one category to another
Move mails from one category to another
The above image makes it all very clear, just in case any body have any problem.

move all emails to another category
Move all mails to other category

Tuesday, 13 August 2013

The best way to re-size screenshots

| Tuesday, August 13, 2013 | | Be first to comment!

Image re-size options are always given in any of the blogging platform, Blogger, WordPress, etc. But sometimes your image is a bit larger than the content area and thus your are required to opt for a smaller size, so that your image can be displayed without overflowing the posts display ares. 

These re-sizes done by the blogging platform only changes the HTML markup of the of the image. These re-sizes can render the text in the screen shot blurred a bit, makes the text a bit harder to eyes, making it look like it is low quality image. And thus, your overall visual quality suffers.

Apps to take screen shots

Some of the apps that can be used are, Windows Snipping Tool, the best part about snipping tool is that the produced image is very low in size without a great harm to the quality of text in the screen shot. 

ALSO SEE: Do conversions using Google Converter
Try WordPress self-hosted for free
Create offers on Facebook fan page
Other software include, ScreenGrab and Greenshot (I recommend green shot as it is packaged with a very lightweight editor with some options like obfuscate, which is best for pixelating confidential information in the screenshot like email, credit card number, etc.)

How to re-size your screenshots ?

These are a series of steps that include cutting off the white-spaces from the images, and thus creating more of area to crop off. This is not applicable for full screen screenshots.

As I mentioned it is all about, curtailing off white-spaces that is removing the part of screen shots that have no content or content that can be ignored.

For this tutorial I will use Paint .NET. You can use other as long as they have some common functionality.


best way to resize image
Original Screen shot but it is 981px in width
Now, no text in the image is visible, my aim is to re-size it down to less than 700px.

Re-sizing screenshot

  1. Open the image in Paint .NET.
  2. You are required to use only three tools, Rectangle Select (shortcut key S), Lasso Select (shortcut key S twice if on any tool except rectangle select), Move selected Pixels (shortcut key M).
final resized image
Final Result Rendered 622 px wide from 981px
As you can see all the white-space is gone, and some not very important components have been cropped off.


area to be removed
Original with highlighted area to be removed
What is removed-
  1. Information is parenthesis, erased using eraser.
  2. "Add Site" button removed using eraser.
  3. White-space between "Your Sites" column and the vertical divider removed using rectangular selection and move selected pixels.
blogger resize screen shots
Selecting and moving pixels

Another way of resizing screen shot

All new sites are designed using the responsive css. So, all you need is to resize your browsers size, and then site take screen shot.

Wednesday, 7 August 2013

Get Despicable Me 2 and Pandi stickers for Facebook Chat

| Wednesday, August 07, 2013 | | Be first to comment!

Facebook smiley were used every where in almost every chat. Smiley sometimes, act as mood changer and help you express yourself or your moment in a better way.

get despicable me 2 stickers for Facebook chat
Stickers Store Facebook
Facebook now allows you to make your chat more expressible with your favorite animation movie and cartoon characters. You get to select from a bunch of menu. The available options include, Despicable Me 2, Snoopy, Finch (are a better version of the old smiley), etc. All these will help you make your chat more happening.


The only problem is that, unlike the regular smiley you don't have any simple code to write like :), :D, etc. And as soon as you click on any of the sticker they get posted, it is your choice to place your message first or your sticker first.


By default you will have only the regular smiley and Meep stickers you need to add the rest using the Stickers Store. With Meep (better version of the classic smiley package) you will use the classic smiley only when putting then using the expressions like the above :D, :), :(, etc.

Tuesday, 6 August 2013

Do conversions using Google Convertor

| Tuesday, August 06, 2013 | | Be first to comment!

Doing different conversions are a part of daily usage of many people online or offline. Using phone or smartphone applications are the newer version of accomplishing such tasks but not everybody is interested in downloading and installing apps for doing some conversion for once in a month, sometimes frequency is greater.

With Google you can do a number of conversions. Though this feature has been around from a long time but a lot still don't know these functionality.  The available options are-
  1. Temperature,
  2. Length,
  3. Mass,
  4. Speed,
  5. Volume,
  6. Area,
  7. Fuel Consumption,
  8. Time, and
  9. Digital Storage
Conversion can be done simply by typing in the search bar. For example, if you want to convert a value from Kilobit (Kb) to bytes, then simple type "800 Kb in bytes", as simple as that.

ALSO SEE: Peek inside NYC Restaurants with Google Maps
Meet 10 for 10 Adsense Publishers in HD
Secure Facebook with Trusted Accounts
unit conversion using google
Converting using Google

Currency Conversion

Currency conversions are also possible but they come under the finance part of the Google, and are unavailable on the conversion widget displayed above. The reason is that the conversions listed above are fixed unit conversion whereas the currency conversions are not fixed they tend to change on daily basis. Therefore they can't be placed with the regular unit conversion widget.

Google currency converter
Currency Conversions using Google
Currency can be converted similarly as the unit conversions using the same simple process of typing as a string or sentence. Another example, to convert pound to dollar type in "1 pound in dollars".

Sunday, 4 August 2013

Facebook new Insight for fan page

| Sunday, August 04, 2013 | | Be first to comment!

With every fan page you create on Facebook, you get an admin panel and an insight page too. The insight page lets you have a full detailed analytic data regarding your Facebook page. 

It allows you to track every instance (free or paid), to be tacked down. You each and every posts, you can track reach, posts clicks and likes and comment in details with numeric count and charts.
New Facebook insights for fan pages
Click to enlarge: Recent posts reach & engagement details

This interface is still available in beta phase and it is required that you must be using Facebook as "you" not as your page.

Get New insight

  1. To get the new insight, now.
  2. Log-in into your Facebook account.
  3. Switch to use Facebook as your page.
  4. Now, navigate to Home using the head "Home" menu.
  5. Select "Insights" from the Favorites.
  6. Now you will get a "Try New Insight" button.
  7. Right click and copy the link, you can directly click too but it will show you a message saying you are required to use Facebook as you not your page. And you will have a button saying "Continue as [your name]" but it may not work.
  8. So, copy the link, and then switch back to you.
  9. Now, paste the address in your browsers address bar.
This is required to be done once then you will be redirected to the new insights whenever you will try to access the insights.


Insight option appears on your page
Now, you will get message like the above on your page you don't even require, to switch to use Facebook as your page.


total likes as per each day on Facebook
Total Page likes on each date
The new insight is divided into four main parts namely, Overview, Page, Posts, People. With the new insight you can track when your page loosed a fan or your page was in a way un-liked or disliked. This was not possible before.

You can also track-

Users landing on your page from outside Facebook.
Pages and Tab visits
Posts by other, offers purchased from your page
This one is best, when your Facebook fans are online. This helps you know what is the best times to publish a post an it will reach the maximum number of your fans.
Track by demographics and gender.
Viewers were fans or not.

Monday, 29 July 2013

How to see new likes on your Facebook Fan Page?

| Monday, July 29, 2013 | | Be first to comment!

Having a new like is great, and knowing who liked is even better. See the list of new and recent likes by others on your Facebook brand page. Explore all of them make new admins, explore those who like your content and admire it.

list of new likes on Facebook page
List of recent fans of your Facebook page

How to see new likes?

  1. Log in into your Facebook account.
  2. Switch to your page.
  3. Now click the friends button from the header navigation bar.
Whenever a new like or fan is gained, the person is highlighted in this list. You can access all your fans using this list.


You can also have a look at other Facebook Pages that like your fan page. To do so, 
  1. Click "See All" link in the likes list.
  2. From the frame that opens you have a drop down menu at the top left.
  3. Toggle using the drop down.
other pages that like your brand page facebook
Other pages that like yours
You can also promote any fan to admin from here, but if you do so make sure you know him/her personally and now it is required that you must know their email address to do so.

As soon as you will click the "Make Admin" button you will be redirected to another page from where you can specify a "role". Giving a role means that you are giving the user restricted privileges for your page, like insight analysts can only view the new likes, posts submitted on your page, people talking about, etc.

Thursday, 25 July 2013

Target users on facebook fan page with privacy controls

| Thursday, July 25, 2013 | | Be first to comment!

Targeting is of great importance when it comes to marketing your product/content to the right audience. Marketing and promotions are very less efficient when it is not targeted to the right audience.

Facebook allows you to target the specific audience among the fans, i.e. the users you have already liked your page. This can be accomplished using the Privacy Control settings of the fan/brand page. The only draw back is that, publishing with targeting specified in your post, will only filter out the individuals who don't lie in the specified criteria.

targeted post on Facebook page
Targeted post on Fan Page

To use this feature you need to turn on or enable privacy control feature. You need to allow yourself to control the privacy of the post you will share on you Facebook fan page.

Turning On Privacy for Fan Page

admin panel and edit settings of Facebook fan page
Edit Page settings of Facebook Fan Page
  1. Go to your page.
  2. From the admin panel, click on "Edit Page" drop down menu.
  3. From there select "Edit Settings" option.
  4. On settings page, search for "Post Privacy Gating".
  5. Edit "Post Privacy Gating" and check the only option present there (Allow me to control the privacy of new posts I make on my Page).
  6. Click the Save button.
change Facebook fan page settings, targeting
Post Privacy Gating : Check the option to allow targetting
NOTE- You have no loss in posting your Facebook status without targeting, but you may loose some fans. Loss of fans is very likely to happen in case of multiple posting within a single day. On pages with high number of likes, any admin cannot determine loss occurred.

Friday, 19 July 2013

Peek inside NYC Restaurants with Google Maps

| Friday, July 19, 2013 | | Be first to comment!

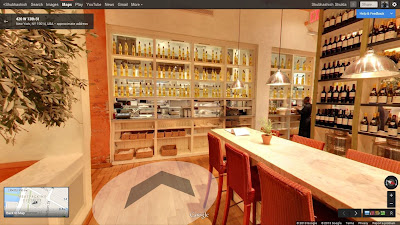
Welcome to NYC's Fig & Olive Restaurant via Google Maps. Click the image below to enlarge. More maps will join Google's mapping service soon.

Fig & Olive Restaurant Google maps inside view NYC
Fig & Olive Restaurant Inside View : Click to enlarge

Google Maps is getting better every day. After rolling a still in trial version of the New Google maps, Google Maps has introduced some new maps.

Click See inside to view restaurants from inside
New York City have over 25,000 restaurants approximately. These maps allow you to have a 360 degree view of the New York City restaurants from the inside. These help out greatly in deciding which one to select in accordance to the occasions or maybe just to have a perfect place to eat.

Friday, 7 June 2013

Meet 10 for 10 Adsense Publishers

| Friday, June 07, 2013 | | Be first to comment!

In every job a new motivation must always be there, to help you work with better presence of mind. Google Adsense announces one "10 for 10" publisher every week from around the world and places a video on YouTube featuring the publisher for the world to watch and also a brief case study in PDFs file.

Therefore, every week there is a new inspiration video waiting for every publisher. Watch it, feel it, get some ideas how to grow yourself, redefine your aims, etc.

Below is the list of those YouTube videos of "10 for 10 publishers". If you too are a publisher then you can apply for 10 for 10 Adsense publisher and get a chance to get featured on Google Adsense's YouTube channel and have your blog promoted too.

Google Adsense announces a "10 for 10" publisher every week. The publisher who gets selected gets a chance to get featured on Adsense's YouTube channel.

How to apply for 10 for 10 Adsense publisher?

  1. Log-in into your Google Account.
  2. Go to the application form page.
  3. Fill out the form.
  4. Upload your logo and Submit.
NOTE- In the form you are required to enter your Adsense Publisher ID.

Where is Adsense Publisher ID?

  1. Log in into your Adsense Account.
  2. On the upper right corner you can find your Publisher Id.
And don't worry your Publisher ID is a publicly accessible value. There is no security risk.


Sunday, 2 June 2013

New Gmail Inbox: How to get it?

| Sunday, June 02, 2013 | | Be first to comment!

On May 29th, Gmail introduced new gmail inbox. The base concept of the new version of gmail inbox is to get easy access to what you exactly want. There are five broad categories of mails that people get. They are-
  1. Primary- Person to person mails.
  2. Social- Mails from social networks, media sharing sites, online dating sites, and other social websites.
  3. Promotions- Deals, offers and other marketing emails.
  4. Updates- Personal auto generated updates including confirmations, receipts, bills and statements.
  5. Forum- Messages from online groups, discussion boards, and mailing lists.

How to get the new inbox?

  1. Log-in into your Gmail account.
  2. Open the 'Settings' drop down menu from upper right corner.
  3. Select 'Configure Inbox'.
  4. Now, you will see Configuration options, select all that you want to show as tabs on your inbox.
  5. Click 'Save'.
get the new gmail inbox
Configure Inbox
The tabs shown are predefined, you cannot create custom tabs. At-least not for now. You can select whether to display your starred emails in primary emails tab or not.

Thursday, 30 May 2013

Add your feeling, what you are watching, having on Facebook

| Thursday, May 30, 2013 | | Be first to comment!

Facebook rolled out a new innovation to put a better status on your Facebook timeline. This feature is an extension to, who you are with (adding other users), place and photos.

The best part still is that you can add who you are with, and it will get appended to your status. Similarly, you can add location and photos for sure.

Feeling

Under feeling you can add a smiley with a word that exactly specifies how you are feeling. It has a range of predefined smiley's. But it still allows you to add anything custom, like adding a word in your own language and then choosing a closely related smiley. This time your status will show the smiley with your own custom word.
Custom feelings in Facebook status
Facebook feeling
Now, because of this custom word addition the smiley list becomes endless.

ALSO SEE: Secure your Facebook account with trusted contacts
Forward your Facebook chat conversations
Facebook Rolled Out Verified Accounts

Watching

Well, this is not only about movies or TV shows. What this does is that, it searches for Facebook fan pages and upon your selection it adds them. 

But the selection is primarily based on the type of status you are adding. For example, if you are adding watching then the genre of Facebook fan page. But the search is not limited to this, that is, you can always add a book with "watching".
reading functionality on Facebook
Watching on Facebook

Reading

Add books you are reading or any other page. You can add custom value in the book field. It even allows you to add a custom icon, just before the book.
adding what you are reading on Facebook
Reading on Facebook

Listening to

Add the artist you are listening to. Here to you can add custom artist and select the type of music by selecting the proper icon.
add artists to your status
I added my own name

Drinking

Add what you are drinking. Tea, coffe, or the best custom. And as it adds Facebook page, so you are always free to drink "titanic","The A Team", etc.

Eating

Add what you are eating. With this too you can eat almost anything but within the status.

Limitations of Facebook's new status innovation

The biggest limitation is that you can add one thing at a time. So, if you are watching a movie and getting bored or great, you cannot add both of these at the same time within a single status.

More Limitations

You cannot add any user. For example, you are "beating" somebody.
Learn more about Facebook here.

Friday, 24 May 2013

Secure your Facebook account with trusted contacts

| Friday, May 24, 2013 | | Be first to comment!

Facebook accounts have great security features, but still users may get hacked, banned by Facebook or sometimes they loose their passwords because of saving their credentials with browsers auto save or in some rare cases while attempting to change their passwords. 

Along with this, the recovering options like email and phone number are not available or are out dates. So, you no longer have access to these. But still you can recover your account by creating a list of trusted accounts.

Facebook's security settings trusted contacts
Facebook Security Settings

How to add trusted contacts in Facebook?

  1. Log in into your Facebook account.
  2. Navigate to 'Security Settings' tab in 'Account Settings'.
  3. Click on 'Trusted Contacts'. Select 'Choose Trusted Contacts'.
  4. Choose your trusted contacts from your friend list and then click 'Confirm'. You are required to add 3 to 5 contacts.
  5. You will be prompted to enter your password to confirm trusted contacts list.
choose trusted contacts in Facebook
Facebook's choose trusted contacts
You can edit this list any time in future. Add new users or delete them.

How to recover Facebook account using trusted contacts?

reset your password in facebook
Reset Your Password
  1. From Facebook homepage click 'Forgot your password' or when you'll get the wrong password error you can select 'forgot your password' from there.
  2. You'll be asked to enter an email address or phone number. Enter your alternative email or just enter any valid looking email address. It is not required in the process.
  3. In the next step ask your trusted contacts to access facebook.com/recover. They will receive your recovery codes. You are required to collect them over phone by calling your trusted contacts.
  4. Enter these codes to access your account.
trusted contacts password recovery Facebook
Ask Your Trusted Contacts
NOTE- Don't make unnecessary users or un-trusted users your 'trusted contacts' in Facebook. They will receive notification that you have added them as your 'trusted contact'. This security feature will get misused.

Wednesday, 22 May 2013

How to hide your friend list in Facebook?

| Wednesday, May 22, 2013 | | Be first to comment!

Not only friends, but family members, acquaintance  classmates, colleagues  co-workers as well are now beings added as you Facebook friend list. It is quite common to find even the users you once shook hands with or sometimes you don't know them at all.

With these conditions, there comes a need to hide your contact list or Facebook friend list. Or make it visible to only a specified users. You can always customize how your friend list's visibility.

hide your Facebook friend list from other users
Hide Facebook friend list

How to hide your Facebook friend list?


  1. Log-in into your account.
  2. Open you profile.
  3. Click on 'Activity Log'.
  4. Under 'Photos', 'Likes', 'Comments' hit 'more' to access the entire navigation list. And the select 'friends'.
  5. Hit the button next to the question "Who can see your friend list?".
  6. Select 'Public' to make it visible to everyone but still requires the other user to be logged-in, 'Friends' to make your friend list visible to your friends, 'Only Me' on your can see your friend list, and 'Custom' to make list visible to specific selected users.
In 'Custom' there are two options, 'Share this with' and 'Don't share this with'. You can enter a list of selected users from your Facebook friend in both the options. First one will make sure that only the users you selected will have the privilege to see your friend list, the second option when selected will make sure that the specified user list cannot see your friend list.